Individual Project 1 Due Thursday September 18, 2025 12:00pm EST (Noon)
🔄 Important Update: Repository Sync Required
If you’ve already accepted the assignment and have a repo set up:
- Check your assignment repo—you should see a Pull Request called “Sync Assignment” waiting to be merged
- Merge this PR first before starting any new work (this is super important!)
- After merging:
- Pull the changes to your local main branch
- Push to your repo to keep everything in sync
- Then continue working on the main branch
Haven’t created your repo yet? No action needed—everything will be up-to-date when you start!
Think of this as your first real-world experience with “Hey, the upstream repo changed—time to sync up!”
Note: If you’re having GitHub authentication issues, check your email for an invitation from us or contact course staff ASAP.
Welcome aboard to the FakeStackOverflow team! We’re glad that you’re here and ready to join our development team as a new software engineer. We’re building an interactive application for an online community to share their knowledge and experience, and are very happy to see that we have so many new developers who can help make this application a reality. By the end of the semester, you’ll be able to propose, design, implement, and test new features for our project. We understand that some of you may have some web development experience, but don’t expect that most of you do, and hence, we have created an individual project to help you get up to speed with our existing codebase and development environment.
FakeStackOverFlow is a web application that consists of some code that runs in each client’s web browser, and also code that runs on a server.
This implementation effort will be split across two deliverables. In this first deliverable, you will implement and test the core backend components for this feature, and in the second deliverable, you will implement and test the frontend components.
Change Log
- 9/5/2025: Added a note about invitations to join neu-cs4530 organization
- 9/8/2025: Added important repository sync instructions. All students with existing repositories must merge the “Sync Assignment” PR before continuing work.
- 9/11/2025: Added clarification. If you find inconsistencies between the handout and the JSDoc comments for the schema, refer to
server/seedData/datato define the schema. - 9/17/2025: Extended deadline by 24 hrs.
Objectives of this assignment
The objectives of this assignment are to:
- Get you familiar with the basics of TypeScript, VSCode, and the project codebase
- Learn how to read and write code in TypeScript
- Translate high-level requirements into code
- Learn how to write unit tests with Jest
Getting started with this assignment
Start by accepting our invitation. It will create a Github repository for you which will include the starter code for this assignment. In case you have enrolled in the course recently, you may not find your name in the student list (which was populated with the list of enrolled students at the start of the semester). Please create a piazza post to contact us and we will add you to the Github Classroom roster.
If you are having difficulty accessing the repo, one possible reason could be that github classroom did not sucessfully add you to the organization. (Update 9/5: we have invited all students to our organization. Check your northeastern email or your spam/junk folder and accept the invitation to join neu-cs4530. You can also view invitations from github site). If you facing this issue, please create a piazza post to contact us and we will send you invitation again.
If you are new to Git, you may want to work on “Learning Basics of Git” assignment first!
1. Prerequisites
1.1 Install Node.js and npm
If you haven’t installed npm and node.js, follow the tutorial on setting up a development environment for this class
1.2 Install MongoDB
We use MongoDB as the NoSQL database to store data related to this application.
- Follow the instructions in the official MongoDB documentation to install the free community edition.
- Choose ‘Install on Linux’, ‘Install on macOS’, or ‘Install on Windows’, depending on your system. (the following steps are for Windows)
- Scroll down to the section labeled ‘Install MongoDB Community Edition.’ and click on MongoDB Download Center.
- For Windows, in the Package dropdown, select
msi. Then download and run the installer. - On Windows, select the “Install MongoDB as a Service” checkbox and install. This will start MongoDB as a background service.
- Install “MongoDB Compass” if prompted.
- Verify if the MongoDB server is running using the Windows Services app.
Mongo offers several methods of interacting with your Mongo databases.
-
MongoDB Compass is an interactive application for creating, modifying, and querying MongoDB connections. It should be started as part of the installation process, showing a connection to
mongodb://localhost:27017/.For Windows, install MongoDB Compass using the instructions above.
For Mac:
- Download the dmg file from https://www.mongodb.com/try/download/compass. Once the application starts:
- Click on “Add new connection” in the left sidebar.
- Make sure the URI field contains
mongodb://localhost:27017 - Click on “Connect” - MongoDB will need to be running as a macOS service
- Download the dmg file from https://www.mongodb.com/try/download/compass. Once the application starts:
-
Mongo shell (mongosh) provides a command-line interface that can be used to interact with databases in MongoDB.
For Windows:
- Download it here using the msi package. You can also use mongosh to see if the MongoDB server is running. Try the MongoDB Community Edition and the command
show dbs; you should see a list of existing databases in your local instance.
For Mac:
- Mongo shell is automatically installed with MongoDB through the Mac installation instructions. To use it, make sure MongoDB is running as a macOS service, then type
mongoshinto the terminal.
- Download it here using the msi package. You can also use mongosh to see if the MongoDB server is running. Try the MongoDB Community Edition and the command
-
Last and most important, you can use the Mongoose api to interact with MongoDB through your JavaScript or TypeScript programs. Mongoose will be installed as part of the installation process for the project starter code.
2. Install the starter code and its dependencies
The starter code package, of which this is a part, is divided into 3 main directories: client, server, and testing.
- Navigate to the root directory of the repo.
- Install the dependencies for each directory by running the following commands:
npm install from the project root
Once you install the dependencies, you might see the following ESlint errors in some files. The linter error indicates that the code contains carriage return characters (\r, represented as ␍) at the end of each line and usually happens when the file has Windows-style line endings (\r\n) instead of Unix-style line endings (\n). To fix this, you can click on the “CRLF” icon on the lower right corner of VSCode and change it to “LF”. Note that this does not count as a linting error when grading.
Note: Please ignore the testing directory as it contains cypress tests that we do not cover in grading.
3. Setup Environment Variables**
- Create a file called
.envin./client. In./client/.envensure the following lines:
REACT_APP_SERVER_URL=http://localhost:8000
- Create a file called
.envin./server. In./server/.envensure the following lines:
MONGODB_URI=mongodb://127.0.0.1:27017
CLIENT_URL=http://localhost:4530
PORT=8000
4. Populate the initial database
Right now, you may run into errors regarding unknown properties. Once you finish implementing both Task 1 and 2 and modify the schema, you should be able to populate the database correctly.
- In the
serverdirectory, runnpm run populate-dbto populate thefake_sodatabase with example data that follows the schema definition. - If you want to delete all the data at any point, you can use
npm run delete-dbto delete all entries in thefake_sodatabase.
5. Familiarize Yourself with Project Dependencies
- Ensure the following packages are installed: mongoose, express, jest, eslint, axios, cors, and nodemon.
- Refer to the documentation for the following packages:
-
Express is a framework to write server-side code.
- The mongoose data modeling library. Mongoose provides JS/TS bindings to MongoDB, so we can manage and manipulate the data from our JS/TS programs.
- nodemon accelerates the development by automatically restarting a node application when file changes in the directory are detected.
-
We use the axios library to send HTTP requests to our server from our client application.
- We use cors to regulate the permissible connections between the clients and the server. The current cors configuration allows all connections to the server for convenience. This is fine for a development environment. In a production environment where the application is deployed on a cloud service, the CORS policy needs to be specified more strictly. Read more about CORS https://developer.mozilla.org/en-US/docs/Web/HTTP/CORS.
Testing Dependencies
For comprehensive testing of your backend implementation, familiarize yourself with these testing libraries:
-
Jest -Testing framework for unit tests. Jest provides test runners, assertion libraries, and mocking capabilities.
-
Supertest - A library for testing HTTP endpoints. Supertest allows you to make HTTP requests to your Express server during tests and assert on the responses. It’s particularly useful for integration testing of your API routes.
-
@types/jest and @types/supertest - TypeScript type definitions for Jest and Supertest to enable proper type checking in your test files.
Key Testing Concepts
- Unit Tests: Test individual functions in isolation (service layer functions)
- Integration Tests: Test how different parts work together (API endpoints with Supertest)
- Mocking: Replace external dependencies (database calls) with controlled mock responses
- Test Coverage: Ensure your tests cover different scenarios, edge cases, and error conditions
Example Supertest usage for testing an API endpoint:
import request from 'supertest';
import app from '../app';

describe('POST /api/collections/create', () => {
  it('should create a new collection', async () => {
    const response = await request(app)
      .post('/api/collections/create')
      .send({
        name: 'Test Collection',
        description: 'A test collection',
        questions: [],
        username: 'testuser'
      })
      .expect(200);

    expect(response.body.name).toBe('Test Collection');
  });
});
6. Explore Useful Resources
- Express Tutorial: https://expressjs.com/en/guide/routing.html
- MongoDB tutorial: A mini tutorial
- Mongoose Queries: https://mongoosejs.com/docs/queries.html
- Mongoose Documents: https://mongoosejs.com/docs/documents.html
- Jest Basics: https://jestjs.io/docs/getting-started
- Mocking in Jest: https://jestjs.io/docs/mock-functions
- Postman tutorial: API Requests & Postman tutorial
Server/Client Architecture
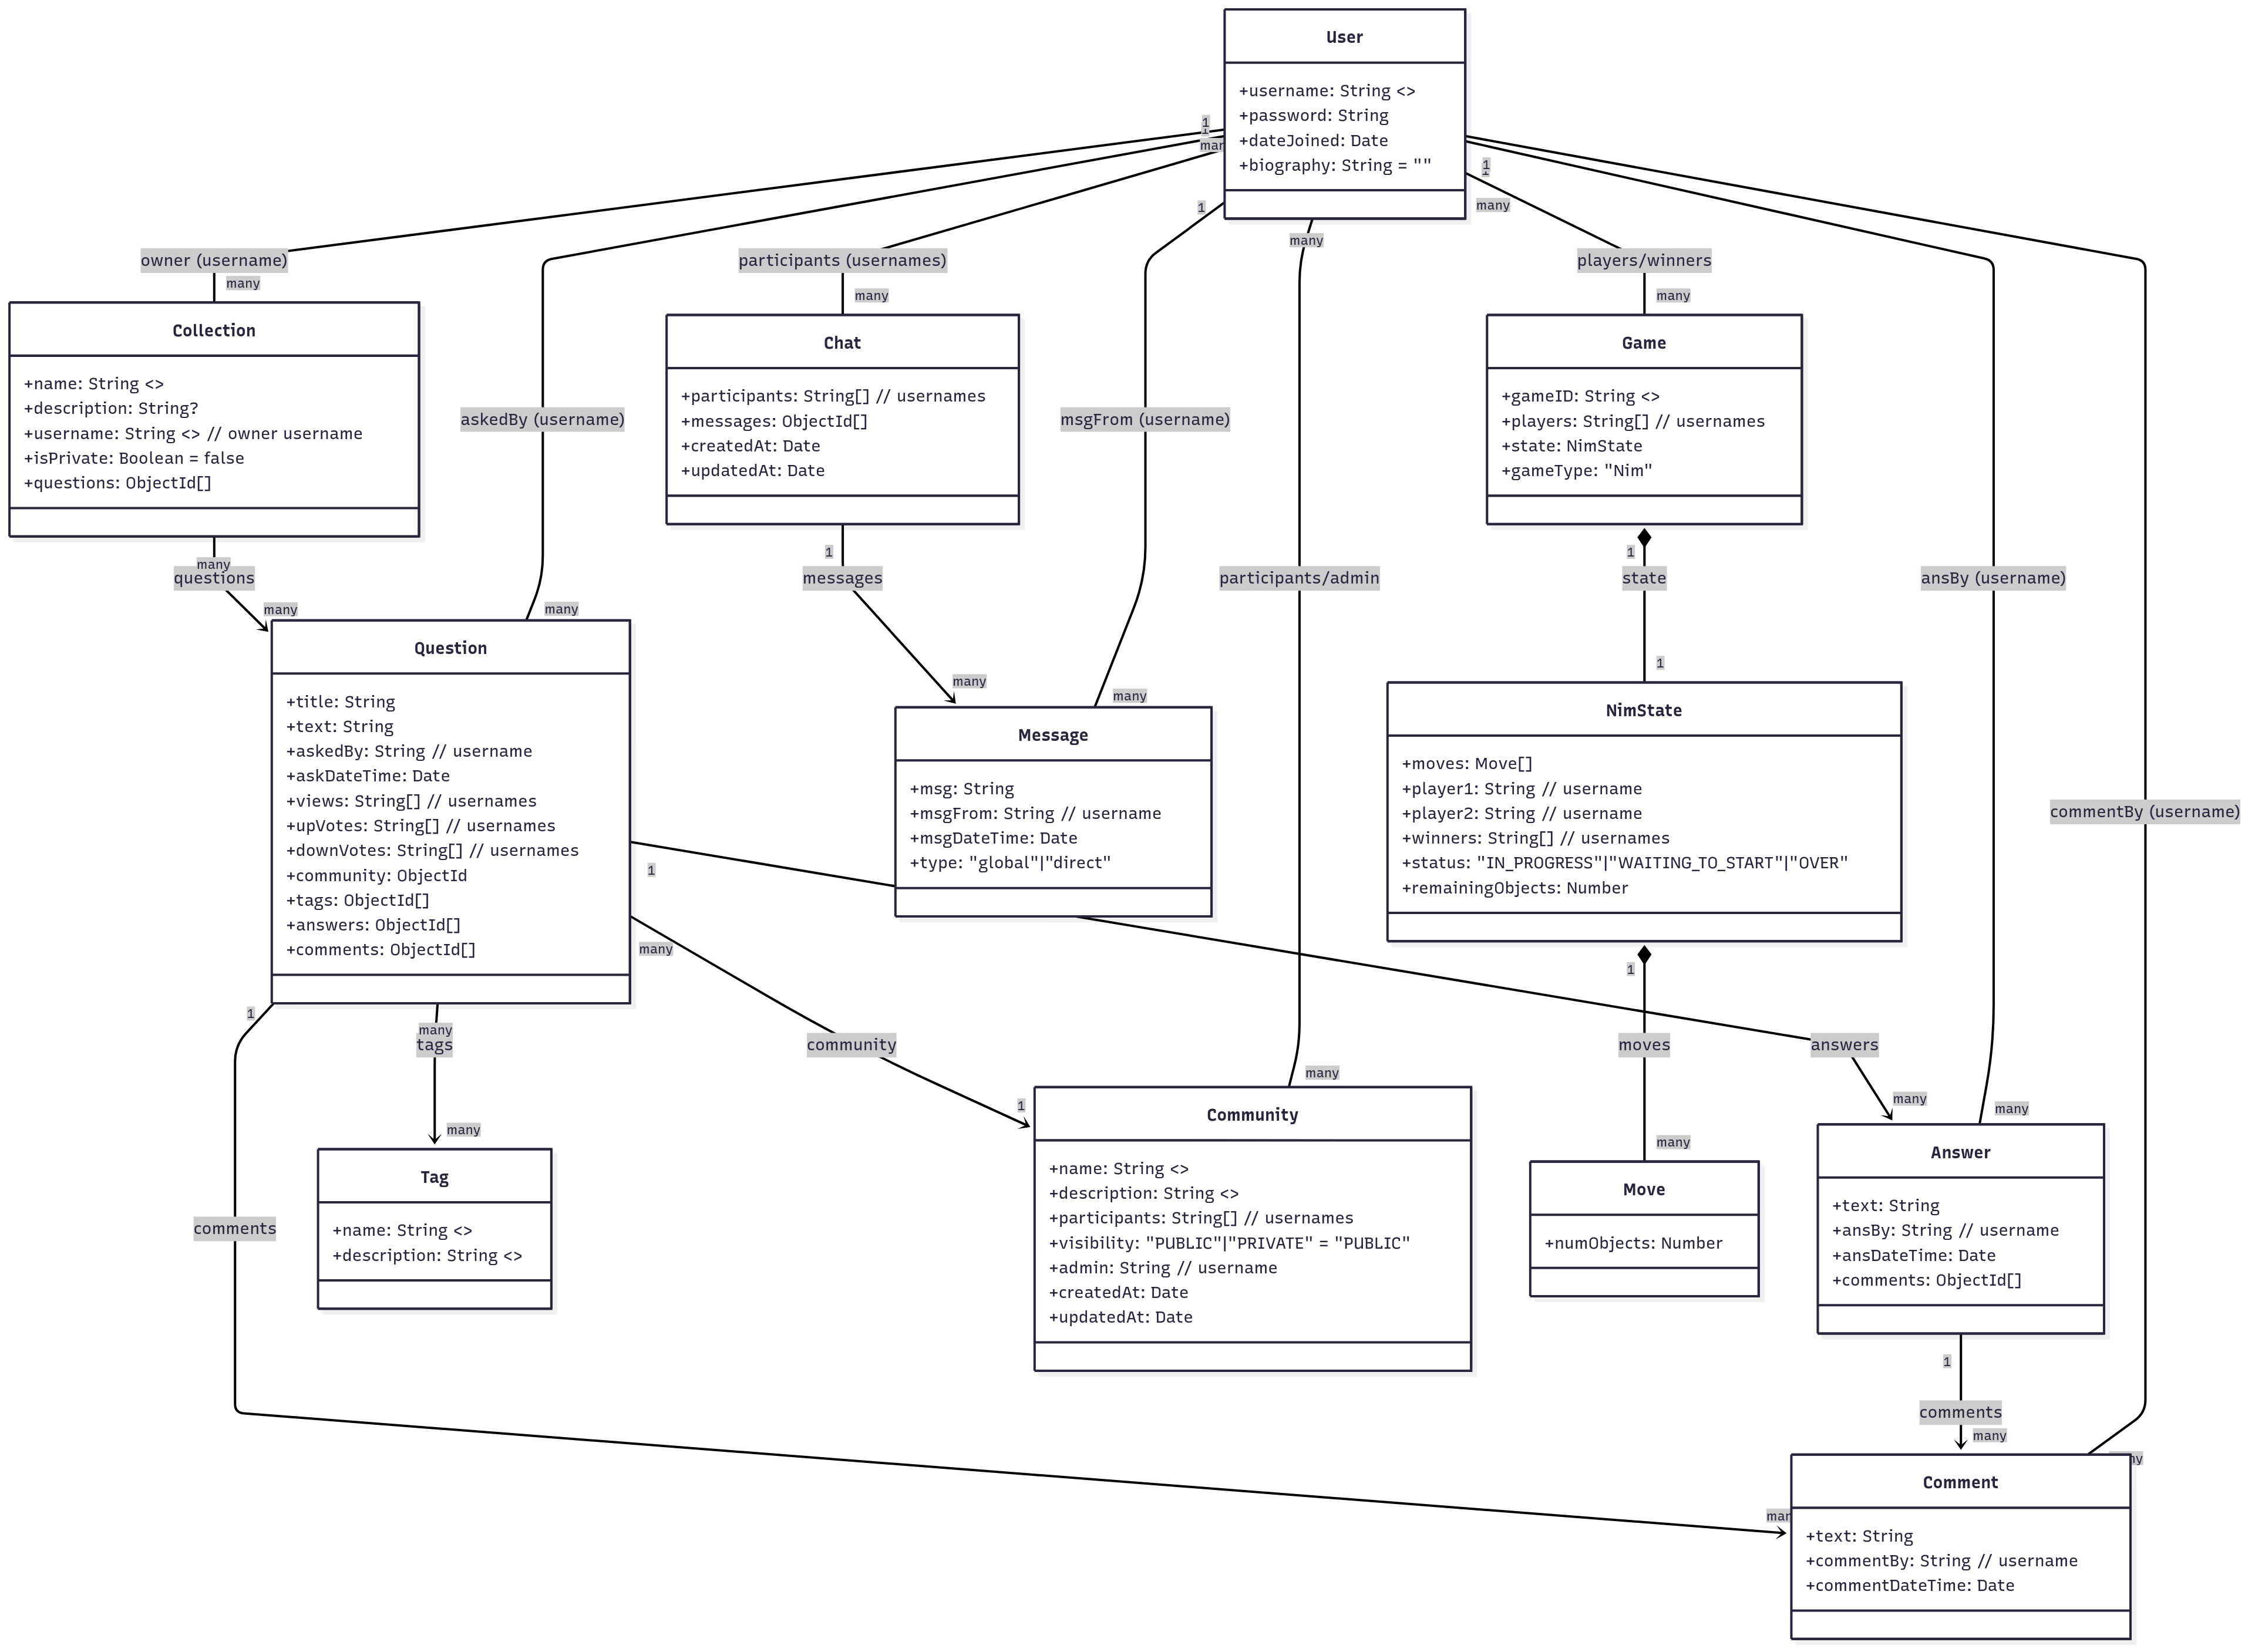
The schemas for the database are documented in the directory server/models/schema.
A class diagram for the schema definition is
shown below:
The starter code package, of which this is a part, is divided into 3 main directories: client, server, and testing.
Client
Running npm run dev will start a client on port 4530.
The client code uses Axios to send HTTP method requests to the server. You should review the client code to understand
how axios sends requests and how the response from the server is processed. You don’t need to make any changes to the client code.
Server
The server is responsible for taking HTTP requests from the client and executing them on the database. The server code resides in the server/ directory. The server is responsible for all the data that is sent back and forth to the database.
The main server script is in server/server.ts. Running npm run dev
will start an HTTP server, which will take HTTP requests on https://localhost:8000, and execute them on the running database instance.
You can send requests to the server using a tool like Postman, or by writing scripts that use axios to send requests to localhost:8000, as you did in the Async activity.
When the server is terminated (using CTRL+C), the message “Server closed.” should be displayed. However, the MongoDB service will still be running (You can run mongosh to confirm)
Testing
Unit tests for the server are in server/tests/*/*.spec.ts. These are written in Jest, which you are already familiar with.
To run the entire set of server tests, go to the server directory and say npm run test. Please ensure that the MongoDB server is up and running for the tests to pass.
If you want to run specific tests, we recommend that you install vsc-jest-runner in your VSC, and select the test or tests that you would like to run.
Summary of the default host/port settings
| Client Instance | https://localhost:4530/ |
| Server Instance | https://localhost:8000/ |
| Database Instance | mongodb://127.0.0.1:27017/fake_so |
Recommendations when working on the project
- Open the client application in a browser and interact with it. While interacting, monitor the application tab in the browser’s developer tools. The application tab will give you information about the HTTP requests the client sends to the server. The HTTP requests will contain URIs in their headers. You can use this information to understand the endpoints in the server.
- Read the Jest tests. The Jest tests list all the endpoints the server should have, and the types of HTTP method associated with them. Further, the tests also have information about the Mongoose functions that need to be invoked for the service to send a successful response.
- Start by defining the schemas in the server/models/schema directory to ensure the data structure is consistent.
- Ensure that you run all Jest tests. These tests are designed to catch issues early. Once all Jest tests pass, the Cypress tests should also pass, assuming no significant changes have been made to the client’s implementation.
- Use Postman to interact with and manually test your solutions and verify that database queries work as expected.
- Follow the debugging policy to help in the debugging process.During visiting office hours, TA’s will expect you to have exhausted all initial debugging strategies as outlined in the provided link.
Implementation Tasks
This deliverable has 2 parts; each part will be graded on its own rubric.You should complete the assignment one part at a time, in the order presented here.
Task 1: Collection
A collection is a curated set of questions related to a specific topic or theme. Users of the website should be able to do the following:
- Create a new collection.
- Delete an existing collection.
- Create a new question in an existing collection.
- Retrieve a collection by Id
- Retrieve all collections by the username of the user that created them.
Steps to Achieve This
-
Create the Mongoose schema for collection
The collection schema defines the structure for storing a collection document in the MongoDB database. Each collection must have the following:
- a name of type string. This is required.
- an optional description of type string.
- a list of questions associated with the collection. An empty list denotes the collection has no questions yet.
- a required username of type string of the user that created the collection.
- a boolean property isPrivate to denote if the collection is private to the user that created it or if it can be used by other users. A collection is private by default.
Define the schema in
server/models/schema/collection.schema.ts. You can verify the schema by running the scripts described in Section 4 of this document. -
Define a Mongoose model for collection
Mongoose requires us to construct a data layer object from a given schema. The data layer object serves as the interface to the database. To this end, define the collection model in
server/models/collection.model.ts. -
Define relevant types
Define the relevant types needed for the collections feature in
server/types/types.d.ts. Be sure to avoid repeated or reduntant type definitions.Please Note: Either modify or use defined types accordingly, some types have already been defined in the shared/types folder and they can be used or modified as needed.
-
Implement the service layer functions
The role of the service layer functions is to interact with the data layer object and the controllers. To this end, define the following functions in
server/services/collection.service.ts:createCollection(collection)creates a new collection in the database if the collection does not exist.deleteCollection(id, username)removes a collection in the database with the given id and created by a user with the given username. It returns the deleted collection if successful, otherwise throws an error.getCollectionByUsername(username, currentUsername)returns all collections stored in the database for a given username. If the given username is not the same as the current user making the request then the private collections must not be returned. Throws an error if the relevant collections cannot be retrieved.getCollectionById(id, username)returns the collection for a given collection ID and created by a user with the username. Throws an error if the collection cannot be retrieved or a private collection is being requested by a user who did not create it.addQuestionToCollection(id, questionId, username)adds a question with a question ID to an existing collection with a given ID and username. If the question being added then removes the question and updates the collection, otherwise creates a new question with the given ID and updates the collection. In either case it returns the updated collection. Throws an error if the collection does not exist or could not be updated.
-
Define the endpoints
Define the following express REST API endpoints in
server/controller/collection.controller.ts:createCollectionRoute(req, res)takes an HTTP request containing the metadata in its body necessary to create a collection and creates a collection. It returns the created collection as response.deleteCollectionRoute(req, res)takes an HTTP request containing a collection ID and the username of the collection and deletes the corresponding collection. It returns the deleted collection as response if the delete was successful.toggleSaveQuestionRoute(req, res)takes an HTTP request with the question ID that needs to be saved and the collection ID where the question will be a part of. It returns the updated collection as response.getCollectionsByUsernameRoute(req, res)takes an HTTP request containing the username of the currently logged in user and the username of some other user. It returns all collections for the username as response.getCollectionByIdRoute(req, res)takes an HTTP request containing the collection ID and the username of the user that created the collection. It returns the corresponding collection as response.
All endpoints return a status code of 200 in their response. However, in case of an error they return a status code 500 in their response and in case of an invalid request they return a status code of 400 in their reponse.
-
Add routes to endpoints
Define the appropriate API routes on the Express router for each of the functions implemented in the previous steps.
Collection Router Implementation Hints:
- Add router definitions at the end of your collectionController function, before returning the router
- Use appropriate HTTP methods:
- POST for
/create- creating new collections - DELETE for
/delete/:collectionId- removing collections (use collectionId as URL parameter) - PATCH for
/toggleSaveQuestion- updating collections with questions - GET for retrieving collections (use URL parameters like
:username,:collectionIdwhere needed)
- POST for
- Collection routes should include:
/create,/delete/:collectionId,/toggleSaveQuestion,/getCollectionsByUsername/:username,/getCollectionById/:collectionId.
-
Write unit tests
We’ve provided initial tests to provide some information on the expected behavior of the routes and functions. Using the requirement descriptions above, write additional tests for all the added functions and routes, covering different branches, edge cases, etc. to verify the correctness of your code.
Add your unit tests to the file
server/tests/services/collection.service.spec.tsandserver/tests/controllers/collection.controller.spec.tsIn addition to automated tests, you should also manually test your route using Postman and MongoDB Compass to ensure that any database queries are correct since we use database mocks while testing with Jest.
Task 2: Communities
A community is a subgroup of users with common interests. A community can be public or private. A public community is open to all users of the platform. On the other hand a private community is only accessible to its members. A community always has an admin selected from its participants/members. Extend the current implementation with the following features:
- Retrieve details of an existing community
- Retrieve details of all communities
- Join/leave a community
- Create a new community
- Delete an existing community
Steps to Achieve This
-
Create the schema
The community schema defines the structure of a document in the community collection of the MongoDB database. Each community must have the following:
- A required unique name of type string.
- A required description of type string.
- A list of participants in the community.
- A visibility type for the community – always must be public or private. The default visibility of a community is public.
- a required admin user of type string.
Define the schema in
server/models/schema/community.schema.ts.Make sure the Questions schema structure in
server/models/schema/question.schema.tshas a reference to an existingcommunity.You can verify the schema by running the scripts described in Section 4 of this document.
-
Define the mongoose model
Mongoose requires us to construct a data layer object from a given schema. The data layer object serves as the interface to the database. To this end, define the community model in
server/models/community.model.ts. -
Define the relevant types
Define the relevant types needed for the communities feature in
server/types/types.d.ts. Be sure to avoid repeated or reduntant type definitions.Please Note: Either modify or use defined types accordingly, some types have already been defined in the shared/types folder and they can be used or modified as needed.
-
Implement the service Layer functions
Define the following functions in
server/services/community.service.ts:-
getCommunity(id)returns an object based on the document in the community collection for an existing community ID. It returns an object with an error property if it fails to retrieve the document. -
getAllCommunities()returns all communities in the community collection in the database. It returns an object with the error property if the retrieval fails. -
toggleCommunityMembership(id, username)takes a community ID and a username and adds the user with the given username as a participant to the community with the given ID if the user is not a participant. If the user is a participant but not an admin in the community then it removes them from the community. It returns an object with the error property if the update to the relevant document fails. -
createCommunity(community)creates a new community in the database with the given community data and returns the newly created community. It returns an object with the error property if the creation fails. -
deleteCommunity(id, username)deletes an existing community with the given id from the database when requested by a user with the given username and if the user is an admin. It returns an object with the error property if deletion fails or the user is not an admin of the community.
-
-
Define the endpoints
-
getCommunityRoute(req, res)takes an HTTP request that contains a community ID and returns the found community as response. -
getAllCommunitiesRoute(req, res)takes an HTTP request and returns all communities as response. -
toggleMembershipRoute(req, res)takes an HTTP request containing the username of the user that wants to leave/join a community with an ID. It returns the updated community object as response. -
createCommunityRoute(req, res)takes an HTTP request containing the necessary metadata needed to create a community and returns the newly created community as response. -
deleteCommunityRoute(req, res)takes an HTTP request containing the username of the user requesting the delete and the community ID that needs to be deleted. It returns the deleted community as response.
-
-
Add routes to endpoints
Define the appropriate API routes on the Express router for each of the functions implemented in the previous steps.
Community Router Implementation Hints:
- Add router definitions at the end of your communityController function, before returning the router
- Use appropriate HTTP methods:
- GET for
/getCommunity/:communityId- retrieving a specific community (use communityId as URL parameter) - GET for
/getAllCommunities- retrieving all communities - POST for
/toggleMembership- updating community membership (sends data in request body) - POST for
/create- creating new communities - DELETE for
/delete/:communityId- removing communities (use communityId as URL parameter)
- GET for
- Community routes should include:
/getCommunity/:communityId,/getAllCommunities,/toggleMembership,/create,/delete/:communityId - Note:
/toggleMembershipuses POST (not PATCH) and sends communityId and username in the request body
-
Write unit tests
We’ve provided initial tests to provide some information on the expected behavior of the routes and functions. Using the requirement descriptions above, write additional tests for all the added functions and routes, covering different branches, edge cases, etc. to verify the correctness of your code.
Add your unit tests to the file
server/tests/services/community.service.spec.tsandserver/tests/controllers/community.controller.spec.tsIn addition to automated tests, you should also manually test your route using Postman and MongoDB Compass to ensure that any database queries are correct since we use database mocks while testing with Jest.
Submission Instructions & Grading
You will submit your assignment using GitHub Classroom.
This submission will be scored out of 100 points, 80 of which will be awarded for implementation of tasks and accompanying tests, and the remaining 20 in the manual testing section covered below.
The grading repo has the autograder’s script files in server/.grading. You are not allowed or supposed to change those files. Editing those files will amount to 0 for the entire assignment. If you accidentally changed them then let us know and we can help you revert those changes. During grading we will verify to see if you changed these files.
When you push to your repo, you will see the autograder run. In the actions tab of your repo look for Autograding Tests job to view your score and feedback from the autograder. The autograder has a total of 80 pts and the breakdown is as follows:
- Task 1 (Collections) - 25 pts
- Correctness tests for service layer - 15 pts
- Correctness tests for controller layer - 10 pts
- Task 2 (Communities) - 25 pts
- Correctness tests for service layer - 15 pts
- Correctness tests for controller layer - 10 pts
- Style checks for lint - 10 pts (no partial credit is awarded)
- Regression tests - 10 pts
-
Coverage for tests - 10 pts
Coverage Percentage Points Awarded ≥ 95% 10 pts (Full Credit) ≥ 90% 6 pts ≥ 85% 2 pts ≥ 80% 1 pt < 80% 0 pts
During development, you may encounter various linting errors. Some common errors include:
- Line Ending Errors (CRLF vs LF)
- You might see carriage return characters (\r, represented as ␍) at the end of lines
- This usually happens when files have Windows-style line endings (\r \n) instead of Unix-style (\n)
- Unused Variables/Functions
- ESLint will flag unused variables or functions
- Import/Export Issues
- Missing imports or incorrect module paths
Your code will automatically be evaluated for linter errors and warnings.
- Lint errors result in a style score of 0/10. No partial credit is awarded in this case.
- Line endings will not be counted as errors.
The starter code comes with some lint problems, You are expected you to fix these linter problems, many of them will be fixed as you implement the tasks.
The use of eslint-disable statements is NOT allowed. Each instance outside what is provided in the starter code will have points deducted.
You can run the following command within the client or server to check for some common lint errors
npm run lint
You can run the following command within the client or server to fix some common lint errors
npm run lint:fix
Testing
You will be provided with starter code that includes a set of tests. Your task is to ensure that all existing tests pass and to create additional tests to cover any new functionality or edge cases.
Please Note: The server tests will fail the first time students run them but this is expected behavior.Please rerun the tests after you have completed the implementation.All server tests will pass after students have implemented the features as well as the corresponding tests. Please also take note until all tests have passed, the Github actions will fail; this is also an expected behavior.These actions will pass when 1.Community and Collection features are implemented and 2.Tests are implemented.
Manual Grading
Your code will be manually evaluated for conformance to our course style guide. Do not wait to run the linter until the last minute. To check for linter errors, run the command npm run lint from the terminal. The handout contains the same ESlint configuration that is used by our grading script.
This manual evaluation will account for 20 points on this assignment. We will manually evaluate your code for style on the following rubric:
- Manual grading - 20 pts
- Documentation & design compliance - 6 pts
- All public properties and methods (other than getters, setters, and constructors) are documented with JSDoc-style comments that describe what the property/method does, as defined in our style guide.
- The code and tests that you write generally follows the design principles discussed in week one. In particular, your design does not have duplicated code that could have been refactored into a shared method.
- No duplicate code is allowed.
- Manual testing with Postman - 14 pts
- Documentation & design compliance - 6 pts
We will review your code and note each violation of this rubric. We will deduct 2 points for each violation, up to a maximum of deducting all 10 style points.
GitHub Actions for Test and Lint Output
Once your submission is pushed to your main branch, GitHub will automatically run linting and the tests in server/tests for your submission. Check the Actions tab on GitHub classroom to see the output of the run. This output will be used for grading, so ensure there are no errors in the Actions run.

Please update the node version used in the github action workflow to be
22.xinstead of20.x. This will fix any memory leaks errors raised while executing the test suite. In particular, change lines 23-26 of.github/workflows/main.ymlto be:
- name: Set up Node.js 22.x
  uses: actions/setup-node@v4
  with:
    node-version: "22.x"
Debugging
If you need help troubleshooting a problem, be sure to follow all the steps outlined in the course’s debugging policy. This will ensure you have exhausted all initial debugging strategies before reaching out for assistance from the TAs.
Academic Integrity
Please refer to the course policy page for more details.
For this assignment, the use of co-pilot or other generative AI technologies such as ChatGPT is not allowed.
```