Individual Project 2 Due Wednesday May 20, 2026 6:00pm (ET)
Welcome back to the Game Nite team! In this second deliverable, you will be implementing new and exciting features to enhance the frontend interface and bring the web application to life. This assignment builds on the foundation you laid in the first project and will deepen your skills in frontend development with TypeScript and React.
The objectives of this assignment are to:
- Investigate and understand a large, existing codebase
- Implement interactive web applications with the React library
Changelog
1. Getting Started
Start by accepting our GitHub Classroom Invitation. It will create a Github repository for you which will include the starter code for this assignment. Run npm install in the root directory to fetch all dependencies for the client, server, and shared folders.
1.1 Optional but Highly Recommended: MongoDB
It’s much easier to work on the application if restarting the server doesn’t reset the entire application to an initial state.
Your starter code uses a proper repository layer, which connects to MongoDB through an adapter library called Keyv. You can install MongoDB on your local machine.
- Follow the instructions in the official MongoDB documentation to install the free community edition.
- Choose ‘Install on Linux’, ‘Install on macOS’, or ‘Install on Windows’, depending on your system. (the following steps are for Windows)
- Scroll down to the section labeled ‘Install MongoDB Community Edition.’ and click on MongoDB Download Center.
- For Windows, in the Package dropdown, select
msi. Then download and run the installer. - On Windows, select the “Install MongoDB as a Service” checkbox and install. This will start MongoDB as a background service.
- Install “MongoDB Compass” if prompted.
- Verify if the MongoDB server is running using the Windows Services app.
Mongo offers several methods of interacting with your Mongo databases.
-
MongoDB Compass is an interactive application for creating, modifying, and querying MongoDB connections. It should be started as part of the installation process, showing a connection to
mongodb://localhost:27017/.For Windows, install MongoDB Compass using the instructions above.
For Mac:
- Download the dmg file from here. Once the application starts:
- Click on “Add new connection” in the left sidebar.
- Make sure the URI field contains
mongodb://localhost:27017 - Click on “Connect” - MongoDB will need to be running as a macOS service
- Download the dmg file from here. Once the application starts:
-
Mongo shell (mongosh) provides a command-line interface that can be used to interact with databases in MongoDB.
For Windows:
- Download it here using the msi package. You can also use mongosh to see if the MongoDB server is running. Try the MongoDB Community Edition and the command
show dbs; you should see a list of existing databases in your local instance.
For Mac:
- Mongo shell is automatically installed with MongoDB through the Mac installation instructions. To use it, make sure MongoDB is running as a macOS service, then type
mongoshinto the terminal.
- Download it here using the msi package. You can also use mongosh to see if the MongoDB server is running. Try the MongoDB Community Edition and the command
1.2 Setting Up the Server To Use MongoDB
Create a file called server/.env — the dot before the “env” is important! Include the following text:
MONGO_STR=mongodb://127.0.0.1:27017
MONGO_DB_NAME=GameNiteLocalDev
This tells your server how to connect to the local MongoDB instance that you got running in the previous step. Now, you can start the application as before: in one terminal, run:
ip2-me $> npm run dev -w=server
Leaving that running, open another terminal and run:
ip2-me $> npm run dev -w=client
The application should work as before, but any changes you make in the application should survive restarting the server.
2. Recommendations When Working on the Project
- Have the frontend and backend running, and have the project open in your browser, while you are working. It’s very useful to have the website update as you make changes.
- Frequently add and commit changes with git. This saves your changes and makes it easy to go back to a state where most tasks were complete. The first three tasks are cumulative, as are the last three tasks, and if you run into trouble with Task 5, you will want to be able to backtrack to a working implementation of Task 4.
- Do not wait until the last minute to run
npm run lintandnpm run checkto check for linter and typescript errors! - Follow the debugging policy to help in the debugging process.
- Task 5 is more challenging than the other tasks, but is only worth 24% of credit. Don’t wait until the last minute to attempt this task if you intend to complete all parts of the assignment.
3. Project Submission
You will submit your code by pushing the final version into your repository (add/commit/push). All commits must be visible on the main branch on GitHub classroom to receive credit. Be sure to check if the correct version is submitted before the deadline.
On Gradescope, you will submit a .pdf file containing a link to your project’s GitHub repo (e.g. https://github.com/neu-cs4530/ip2-robsimmons).
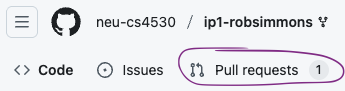
We will grade your code on GitHub by using the “Feedback” PR that is automatically created when the assignment is. The Feedback PR can be found under the “Pull requests” menu, like this:
If you don’t see your Feedback PR for the assignment, let us know on Piazza (be sure to include your GitHub username in your post).
Grades will be assigned on Gradescope and synced to the Canvas Gradebook.
TypeScript ESLint, Vitest, and Configuration Files
The GitHub project contains a number of configuration files you may not modify. The files package.json, .prettierrc, tsconfig.json, vitest.config.mjs, and vite.config.mjs are examples of configuration files, as is everything in the .github directory. If you change any of these files, take care to change them back; the list of changes in the feedback PR should not show any changes to these files. You also may not include eslint-disable commands to disable ESLint’s checks in your final submission.
The code you submit must pass GitHub’s automatic checks, which mostly just amount to the TypeScript typechecker, the ESLint linter, and the tests. You can run these yourself like this:
ip1-me $> npm run prettier --workspaces
ip1-me $> npm run check --workspaces
ip1-me $> npm run lint --workspaces
ip1-me $> npm run test --workspaces
When you push your code to GitHub, you can see the status icon for your most recent submission. It’s initially a yellow circle, like this:

After the tests run, this will turn into a red ❌ or a green ✅. Clicking on the icon will let you see details of the tests we ran.
The Actions tab on GitHub has the results of previous runs.

Up to 25% of your total grade on the assignment may be deducted for CI failures (5% for Prettier failures, 10% for TypeScript failures, and 10% for ESLint failures). In severe cases we may decline to grade your assignment entirely. Give yourself sufficient time to find and fix any errors. ESLint warnings do not cause CI to fail and will not automatically lead to a deduction, but it is bad practice to have lots of console statements in your code, and this can lead to a point deduction if it makes it hard for a TA to understand your code.
4. Implementation Tasks
Task 1: Navigating to Other Profiles
Currently, going to the “Profile” link at the top of your page takes you to the path /profile/<yourusername>. Change client/src/components/MessageList.tsx so that clicking on the users’ display name in chat takes you to the path /profile/<theirusername>. For example, if you are logged in as user0 and you see a chat message from “Yāo” (the display name for user1), that should be a <NavLink> that takes you to /profile/user1.
This task is worth 10 points, based on checking that chat navigation works as expected.
Task 2: Viewing Other Profiles
Change client/src/pages/Profile.tsx so that, if you are logged in as user0 and navigate to /profile/user1, you see a page that allows you to see but not edit that user’s username, display name, and when their account was created.
You may want to split this file into two or three new files, since the route to profile pages is now being used for two different purposes: viewing and editing your own profile, and viewing other profiles. Check client/src/services/userService.ts for a useful helper function.
This task is worth 25 points:
- 10 points will be based on functionality.
- 15 points will be based on appropriately refactoring your code into multiple files with appropriate code style.
Task 3: More Profile Navigation
The code you changed in Task 1 was only one place where user display names were referenced. Here are some others:
- The “(DisplayName) entered chat” messages in chat
- The “Player #2 is (DisplayName)” messages in the game panel
- “Posted by (DisplayName)” in forum messages
- “Reply by (DisplayName)” in forum comments
- “(Display name) created 1 day ago” on the home page and the game list and forum list pages
For this task, you’ll make threetwo changes to all display name locations:
- Consistently refer to the current logged-in user by the second-person pronoun “you,” instead of by their display name. (The exception is the “signed in as (DisplayName)” message in the header — leave that alone.)
- Consistently link other users’ usernames to their profile. References to the current user (“you”) should not link to the current user’s profile.
This task is worth 15 points:
- 1 point for each of the 2 changes in each of the 5 places where display names occur.
- 5 points for style and organizing your code in a way that minimizes duplication.
Task 4: Checkers
The backend has been fully implemented for Checkers, a two-player strategy board game.
In this version of Checkers, the rules are as follows:
- The board is 8×8. Red pieces (player 1) start on rows 5–7; black pieces (player 2) start on rows 0–2. Pieces only occupy dark squares (squares where row + col is odd).
- Every piece can move one square in any of the four diagonal directions.
- A piece can capture an enemy piece that is diagonally adjacent by jumping over it to the empty square on the other side.
- Captures are mandatory: if any capture is available, the player must capture.
- The player with no legal moves loses.
The backend logic for Checkers is implemented — you can read the type descriptions in shared/src/games/checkers.types.ts, the implementation in server/src/games/checkers.ts, and the tests in server/tests/games/checkers.spec.ts. The frontend implementation in client/src/games/CheckersGame.tsx is the only part that is completely missing, and you will implement the game’s frontend in React for this task.
The task is worth 26 points, two points for each of the following conditions of satisfaction:
- The game board is displayed as an 8×8 grid of squares. Dark squares (where
(row + col) % 2 === 1) should have a visibly different background color from light squares. - Red pieces are displayed on their squares in a visually distinct way (e.g., a red circle). Black pieces are displayed distinctly (e.g., a dark circle). Empty squares show nothing.
- The current player’s name (or “your turn” if it is the viewer’s turn) is shown somewhere near the board.
- Non-players (watchers) always see all squares with
cursor: default. Clicking anywhere on the board never sends a move. - If it is the current player’s turn and the game is not over, their pieces should have
cursor: pointer. Clicking on a piece that has no legal moves should have no effect. - Clicking on one of the current player’s pieces that has legal moves should select it — the selected piece should be visually highlighted.
- After selecting a piece, the squares it can legally move to should be visually highlighted (e.g., a different background color).
- Clicking a highlighted destination square should submit the correct move to the server. The move format is
{ from: [fromRow, fromCol], to: [toRow, toCol] }. - After submitting a move, the selection should be cleared.
- If the game is over, all squares should have
cursor: defaultand clicking anywhere should not send a move. - If the game is over, a message should be shown indicating who won (e.g., “Red wins!” or “Black wins!” for watchers, “You won!” or “You lost!” for the player).
- Clicking on a piece that belongs to the opponent, or on a non-highlighted dark square, should deselect the current selection (if any).
- Kings are introduced in Task 5. You do not need to handle
"RK"or"BK"entries in this task.
Your implementation does not need to match any particular visual style. It must be possible for a TA to effectively test each condition of satisfaction.
Task 5: Kings and Multi-Captures
In this task you will extend the Checkers game to support kings and multi-capture chains, and restrict regular pieces to forward-only movement. This requires changes across shared/src/games/checkers.types.ts, server/src/games/checkers.ts, server/tests/games/checkers.spec.ts, and client/src/games/CheckersGame.tsx.
The new rules are:
Movement changes:
In the starter code, all pieces can move in any of the four diagonal directions. In Task 5 you will change this:
- Regular pieces may only move forward: red pieces move upward (decreasing row), black pieces move downward (increasing row).
- Kings may move in all four diagonal directions, including backwards.
Kings:
When a piece reaches the opposite back rank — row 0 for red, row 7 for black — it becomes a king. Kings are represented as "RK" (red king) and "BK" (black king) in the CheckersEntry type.
Multi-capture chains:
After a king captures a piece, if another capture is available from its new position, it must continue capturing. A king’s turn does not end until no further captures are available. Regular pieces still perform a single capture and their turn ends immediately.
Move format:
To support multi-capture chains, the move format must be extended. Instead of { from, to }, moves are now represented as a sequence of squares: { squares: [[r0,c0], [r1,c1], ..., [rN,cN]] }. A simple move has two squares (from and to); a multi-capture chain has three or more. The server’s viewAs() method exposes legalMoves — each legal move is the complete sequence of squares the piece visits. Your frontend should use these sequences to submit complete moves.
Conditions of satisfaction:
- A piece that reaches the opposite back rank is promoted to a king (
"RK"or"BK"). Kings are displayed differently from regular pieces (e.g., with a crown symbol♛or a visual indicator). - The move format is extended:
CheckersMovenow hassquares: [number, number][]instead offrom/to. Update the Zod validator (zCheckersMove) accordingly. - Regular pieces may only move and capture forward. Red pieces move toward row 0; black pieces move toward row 7. A move that goes in the wrong direction should be rejected by the server.
- Kings may move and capture in all four diagonal directions, including backwards.
- After a king makes a capture, if another capture is available, the server generates legal moves that are multi-step sequences for that king. The king must keep capturing until no further captures are available.
- Regular pieces are limited to a single capture per turn, even if a second capture would be geometrically possible.
- The server correctly removes all captured pieces along a multi-capture chain.
- The frontend correctly submits the full move sequence for a multi-capture chain. When the
legalMovesview contains a sequence longer than two squares, the frontend submits the full sequence. - The existing tests in
checkers.spec.tsare updated to reflect the new rules and pass. This includes updating any existing tests that no longer hold for example, the test that verifies pieces can move in all four directions must be updated to reflect that regular pieces are now restricted to forward-only movement. New tests are added that achieve ≥95% line and branch coverage ofserver/src/games/checkers.ts, covering king promotion, forward-only movement for regular pieces, king movement in all four directions, and multi-capture chains.
This task is worth 24 points:
- 6 points for king promotion and forward-only restriction (conditions 1–3)
- 8 points for king movement and multi-capture server logic (conditions 4–7)
- 4 points for frontend support (condition 8)
- 4 points for tests (condition 9 — ≥95% coverage with new tests)
- 2 points for code style and appropriate documentation
5. Grading Summary
The assignment as a whole is worth 100 points.
- Task 1: 10 points
- Task 2: 25 points
- Task 3: 15 points
- Task 4: 26 points
- Task 5: 24 points