Individual Project 1 Due Wednesday January 22, 2025 12:00pm EST (Noon)
Welcome aboard to the Stack Overflow team! We’re glad that you’re here and ready to join our development team as a new software engineer. We’re building an interactive application for an online community to share their knowledge and experience, and are very happy to see that we have so many new developers who can help make this application a reality. By the end of the semester, you’ll be able to propose, design, implement, and test new features for our project. We understand that some of you may have some web development experience, but don’t expect that most of you do, and hence, we have created an individual project to help you get up to speed with our existing codebase and development environment.
FakeStackOverFlow is a web application that consists of some code that runs in each client’s web browser, and also code that runs on a server.
This implementation effort will be split across two deliverables. In this first deliverable, you will implement and test the core backend components for this feature, and in the second deliverable, you will implement and test the frontend components.
Change Log
- 1/7/2025: Added a note about updating the Node version in the GitHub Actions workflow. (
.github/workflows/main.yml) - 1/6/2025: Added a note about a typo in the starter code comment for createUser (
server/controllers/user.controller.ts) - 1/5/2025: Added a note about a typo in the starter code (
server/controllers/message.controller.tsandclient/src/services/messageService.ts)
Objectives of this assignment
The objectives of this assignment are to:
- Get you familiar with the basics of TypeScript, VSCode, and the project codebase
- Learn how to read and write code in TypeScript
- Translate high-level requirements into code
- Learn how to write unit tests with Jest
Getting started with this assignment
Start by accepting our invitation. It will create a Github repository for you which will include the starter code for this assignment. In case you have enrolled in the course recently, you may not find your name in the list. Please create a piazza post to contact us and we will add you to the Github Classroom roster.
If you are new to Git, you may want to review the getting started page available in your project repository (look for “The Basics of GitHub.md”)!
1. Prerequisites
1.1 Install Node.js and npm
If you haven’t installed npm and node.js, follow the tutorial on setting up a development environment for this class
1.2 Install MongoDB
We use MongoDB as the NoSQL database to store data related to this application.
- Follow the instructions in the official MongoDB documentation to install the free community edition.
- Choose ‘Install on Linux’, ‘Install on macOS’, or ‘Install on Windows’, depending on your system. (the following steps are for Windows)
- Scroll down to the section labeled ‘Install MongoDB Community Edition.’ and click on MongoDB Download Center.
- For Windows, in the Package dropdown, select
msi. Then download and run the installer. - On Windows, select the “Install MongoDB as a Service” checkbox and install. This will start MongoDB as a background service.
- Install “MongoDB Compass” if prompted.
- Verify if the MongoDB server is running using the Windows Services app.
Mongo offers several methods of interacting with your Mongo databases.
-
MongoDB Compass is an interactive application for creating, modifying, and querying MongoDB connections. It should be started as part of the installation process, showing a connection to
mongodb://localhost:27017/.For Windows, install MongoDB Compass using the instructions above.
For Mac:
- Download the dmg file from https://www.mongodb.com/try/download/compass. Once the application starts:
- Click on “Add new connection” in the left sidebar.
- Make sure the URI field contains
mongodb://localhost:27017 - Click on “Connect” - MongoDB will need to be running as a macOS service
- Download the dmg file from https://www.mongodb.com/try/download/compass. Once the application starts:
-
Mongo shell (mongosh) provides a command-line interface that can be used to interact with databases in MongoDB.
For Windows:
- Download it here using the msi package. You can also use mongosh to see if the MongoDB server is running. Try the MongoDB Community Edition and the command
show dbs; you should see a list of existing databases in your local instance.
For Mac:
- Mongo shell is automatically installed with MongoDB through the Mac installation instructions. To use it, make sure MongoDB is running as a macOS service, then type
mongoshinto the terminal.
- Download it here using the msi package. You can also use mongosh to see if the MongoDB server is running. Try the MongoDB Community Edition and the command
-
Last and most important, you can use the Mongoose api to interact with MongoDB through your JavaScript or TypeScript programs. Mongoose will be installed as part of the installation process for the project starter code.
2. Install the starter code and its dependencies
The starter code package, of which this is a part, is divided into 3 main directories: client, server, and testing.
- Navigate to the root directory of the repo.
- Install the dependencies for each directory by running the following commands:
cd client/
npm install
cd ../server
npm install
cd ../testing
npm install
Once you install the dependencies, you might see the following ESlint errors in some files. The linter error indicates that the code contains carriage return characters (\r, represented as ␍) at the end of each line and usually happens when the file has Windows-style line endings (\r\n) instead of Unix-style line endings (\n). To fix this, you can click on the “CRLF” icon on the lower right corner of VSCode and change it to “LF”. Note that this does not count as a linting error when grading.
3. Setup Environment Variables**
- Create a file called
.envin./client. In./client/.envensure the following lines:
REACT_APP_SERVER_URL=http://localhost:8000
- Create a file called
.envin./server. In./server/.envensure the following lines:
MONGODB_URI=mongodb://127.0.0.1:27017
CLIENT_URL=http://localhost:3000
PORT=8000
4. Populate the initial database
Right now, you may run into errors regarding unknown properties. Once you finish implementing both Task 1 and 2 and modify the schema, you should be able to populate the database correctly.
- In the
serverdirectory, runnpm run populate-dbto populate thefake_sodatabase with example data that follows the schema definition. - If you want to delete all the data at any point, you can use
npm run delete-dbto delete all entries in thefake_sodatabase.
5. Familiarize Yourself with Project Dependencies
- Ensure the following packages are installed: mongoose, express, jest, eslint, axios, cors, and nodemon.
- Refer to the documentation for the following packages:
-
Express is a framework to write server-side code.
- The mongoose data modeling library. Mongoose provides JS/TS bindings to MongoDB, so we can manage and manipulate the data from our JS/TS programs.
- nodemon accelerates the development by automatically restarting a node application when file changes in the directory are detected.
-
We use the axios library to send HTTP requests to our server from our client application.
-
We use cors to regulate the permissible connections between the clients and the server. The current cors configuration allows all connections to the server for convenience. This is fine for a development environment. In a production environment where the application is deployed on a cloud service, the CORS policy needs to be specified more strictly. Read more about CORS https://developer.mozilla.org/en-US/docs/Web/HTTP/CORS.
- We use mockingoose to mock Mongoose functions when testing.
6. Explore Useful Resources
- Express Tutorial: https://expressjs.com/en/guide/routing.html
- MongoDB tutorial: A mini tutorial.
- Mongoose Queries: https://mongoosejs.com/docs/queries.html
- Mongoose Documents: https://mongoosejs.com/docs/documents.html
- Jest Basics: https://jestjs.io/docs/getting-started
- Mocking in Jest: https://jestjs.io/docs/mock-functions
- Mocking Mongoose functions: https://github.com/alonronin/mockingoose
- Postman tutorial: API Requests & Postman tutorial
Server/Client Architecture
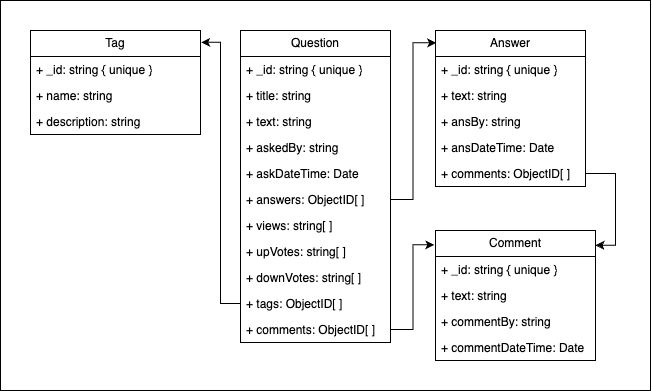
The schemas for the database are documented in the directory server/models/schema.
A class diagram for the schema definition is
shown below:
The starter code package, of which this is a part, is divided into 3 main directories: client, server, and testing.
Client
Running npm run start will start a client on port 3000.
The client code uses Axios to send HTTP method requests to the server. You should review the client code to understand
how axios sends requests and how the response from the server is processed. You don’t need to make any changes to the client code.
Server
The server is responsible for taking HTTP requests from the client and executing them on the database. The server code resides in the server/ directory. The server is responsible for all the data that is sent back and forth to the database.
The main server script is in server/server.ts. Running npm run start
will start an HTTP server, which will take HTTP requests on https://localhost:8000, and execute them on the running database instance.
You can send requests to the server using a tool like Postman, or by writing scripts that use axios to send requests to localhost:8000, as you did in the Async activity.
When the server is terminated (using CTRL+C), the message “Server closed.” should be displayed. However, the MongoDB service will still be running (You can run mongosh to confirm)
Testing
Unit tests for the server are in server/tests/*/*.spec.ts. These are written in Jest, which you are already familiar with.
To run the entire set of server tests, go to the server directory and say npm run test. Please ensure that the MongoDB server is up and running for the tests to pass.
If you want to run specific tests, we recommend that you install vsc-jest-runner in your VSC, and select the test or tests that you would like to run.
Summary of the default host/port settings
| Client Instance | https://localhost:3000/ |
| Server Instance | https://localhost:8000/ |
| Database Instance | mongodb://127.0.0.1:27017/fake_so |
Recommendations when working on the project
- Open the client application in a browser and interact with it. While interacting, monitor the application tab in the browser’s developer tools. The application tab will give you information about the HTTP requests the client sends to the server. The HTTP requests will contain URIs in their headers. You can use this information to understand the endpoints in the server.
- Read the Jest tests. The Jest tests list all the endpoints the server should have, and the types of HTTP method associated with them. Further, the tests also have information about the Mongoose functions that need to be invoked for the service to send a successful response.
- Start by defining the schemas in the server/models/schema directory to ensure the data structure is consistent.
- Ensure that you run all Jest tests. These tests are designed to catch issues early. Once all Jest tests pass, the Cypress tests should also pass, assuming no significant changes have been made to the client’s implementation.
- Use Postman to interact with and manually test your solutions and verify that database queries work as expected.
- Follow the debugging policy to help in the debugging process.
Implementation Tasks
This deliverable has 2 parts; each part will be graded on its own rubric. You should complete the assignment one part at a time, in the order presented here.
Task 1: Add Users
Currently, our site doesn’t allow for users to create unique accounts to use the forum. The objective of this task is to enhance the current functionality by allowing users to:
- Sign up
- Get an account by the username
- Log in
- Reset their password
- Delete their account
As a security feature, make sure to NOT return the user’s password in the result of an operation. We’ve defined a SafeUser type to indicate these kinds of objects. Make sure you follow TDD, so work your way up by making sure your code passes the initial tests provided. For all API endpoints, make sure to validate the provided request and return the appropriate success or error response from the route. Also, include appropriate error handling for functions added.
Steps to Achieve This
-
Create the
UserschemaDefine the mongoose schema for a
Userinserver/models/schema/user.schema.ts. EachUsershould have a unique username, a password, and the date the account was created. -
Define the
UsermodelIn
server/models/user.model.ts, define the mongoose model to be able to perform database operations. -
Define relevant TypeScript types
In
server/types/user.d.ts, define the relevant types as marked by TODO: Task 1. Make sure to avoid repeated definitions of fields between the interfaces. -
Implement the
saveUserfunctionIn
server/services/user.service.ts, implement the logic for creating a newUserdocument in the database. -
Implement the
createUserendpointThere is a typo in the documentation of the
createUserendpoint. It should say “* @param req The request containing username and password in the body.” instead. There is no email attribute in the request body.In
server/controllers/user.controller.ts, implement thecreateUserendpoint. This route will handle POST requests to create a new user with the provided credentials in the request body. You do not need to encrypt the password when storing in the database. -
Implement the
getUserByUsernamefunctionIn the user service, write the logic finding a
Userdocument by the username in the database. -
Implement the
getUserrouteIn the user controller, complete the
getUserendpoint so that it returns the user object that matches the provided username in the GET request params. -
Implement the
loginUserfunctionIn the user service, write the logic to validate if the provided username and password match the document in the database.
-
Implement the
loginUserrouteIn the user controller, complete the
loginUserendpoint so that the provided credentials in the POST request are validated, and a 200 OK response is returned for a success. -
Implement the
updateUserfunctionIn the user service, write code to update the
Userdocument that matches the provided username with the new values ofUserfields. -
Implement the
resetPasswordendpointIn the user controller, fill in the
resetPasswordPATCH endpoint to update the matching user’s password field. -
Implement the
deleteUserfunctionIn the user service, complete the function to delete the document with the matching username from the database.
-
Implement the
deleteUserrouteIn the user controller, use the username provided in the DELETE request params to delete the user from the database.
-
Add the routes to the router
Define the appropriate API routes on the Express router for each of the functions implemented in the previous steps.
-
Test all added functions
We’ve provided initial tests to provide some information on the expected behavior of the routes and functions. Using the requirement descriptions above, write additional tests for all the added functions and routes, covering different branches, edge cases, etc. to verify the correctness of your code.
In addition to automated tests, you should also manually test your route using Postman and MongoDB Compass to ensure that any database queries are correct since we use database mocks while testing with Jest.
Grading (55 points)
- Define schema, model, and User types = 5 points
- Implement
user.service.tsfunctions = 10 points- 2 points for each function
- Implement
user.controller.tsendpoints = 20 points- 4 points for each route
- Testing = 20 points
- 2 points for each function
Task 2: Implement Global Chat
Our website only allows user communication by asking and answering questions. Although any changes to a question is reflected immediately through the use of Socket.io, it is still not an ideal way of real-time communication. In this task, we are going to add a Global Chat system, similar to a public chat room.
Steps to Achieve This
-
Create the
MessageschemaDefine the mongoose schema for a
Messageinserver/models/schema/message.schema.ts. EachMessageshould be able to store the text content, the username of the sender, and the time it was sent. -
Define the
MessagemodelIn
server/models/message.model.ts, define the mongoose model to be able to perform database operations. -
Define relevant TypeScript types
In
server/types/message.d.ts, define the relevantMessagetype to reflect the schema defintion. -
Implement the
saveMessagefunctionIn
server/services/message.service.ts, implement the logic for creating a newMessagedocument in the database. -
Implement the
addMessageRouteendpointIn
server/controllers/message.controller.ts, implement theaddMessageRouteendpoint. This route will handle POST requests to create a new message with the provided parameters in the request body. -
Implement the
getMessagesfunctionIn
server/services/message.service.ts, implement the function for returning all messages from the database, sorted by date in ascending order. -
Implement the
getMessagesRouteendpointThere is a typo in the documentation of the
getMessagesRouteendpoint. It is supposed to say “Fetch all messages in ascending order of their date and time”. The same typo also exists inclient\src\services\messageService.ts, but you don’t need to modify anything.In
server/controllers/message.controller.ts, complete thegetMessagesRouteendpoint so that it returns all messages. -
Test all added functions
The frontend code of Task 2 is provided to you. If you have done everything correctly, you should now be able to run the webpage and test the functionality of the Global Chat feature manually.
In addition, write additional automated tests in
server/tests/controllers/message.controller.spec.tsandserver/tests/services/message.service.spec.ts.
Did you see the pattern in both Task 1 and Task 2? For your final project, when you add a new feature, consider if your new feature should follow this pattern and what change would be needed. For example, if you were to add a direct messaging feature, how should you modify Message so that the web app can send it to a specific user?
Grading (35 points)
- Define Schema, Model, and Message Types = 4 points
- Implement
message.service.tsFunctions = 4 points- 2 pts for each function
- Implement
message.controller.tsEndpoints = 13 points- isRequestValid = 2 points
- isMessageValid = 2 pts
- addMessageRoute = 5 pts
- getMessagesRoute = 4 pts
- Testing = 12 points
- 1.5 points for each function
Submission Instructions & Grading
You will submit your assignment using GitHub Classroom.
This submission will be scored out of 100 points, 90 of which will be awarded for implementation of tasks and accompanying tests, and the remaining 10 for following style guidelines.
Your code will automatically be evaluated for linter errors and warnings.
- Each lint error or warning will result in a deduction of -2 points (up to a maximum of 30 points).
- This will not affect the 10 style points.
- Line endings will not be counted as errors.
The starter code comes with some lint problems, You are expected you to fix these linter problems, many of them will be fixed as you implement the tasks.
The use of eslint-disable statements is NOT allowed. Each instance outside what is provided in the starter code will have points deducted.
You can run the following command within the client or server to fix some common lint errors
npm run lint:fix
Testing
You will be provided with starter code that includes a set of tests. Your task is to ensure that all existing tests pass and to create additional tests to cover any new functionality or edge cases.
Manual Grading
Your code will be manually evaluated for conformance to our course style guide. Do not wait to run the linter until the last minute. To check for linter errors, run the command npm run lint from the terminal. The handout contains the same ESlint configuration that is used by our grading script.
This manual evaluation will account for 10% of your total grade on this assignment. We will manually evaluate your code for style on the following rubric:
To receive all 10 points:
- All new names (e.g. for local variables, methods, and properties) follow the naming conventions defined in our style guide
- There are no unused local variables
- All public properties and methods (other than getters, setters, and constructors) are documented with JSDoc-style comments that describe what the property/method does, as defined in our style guide
- The code and tests that you write generally follows the design principles discussed in week one. In particular, your design does not have duplicated code that could have been refactored into a shared method.
- No duplicate code is allowed.
We will review your code and note each violation of this rubric. We will deduct 2 points for each violation, up to a maximum of deducting all 10 style points.
GitHub Actions for Test and Lint Output
Once your submission is pushed to your main branch, GitHub will automatically run linting and the tests in server/tests for your submission. Check the Actions tab on GitHub classroom to see the output of the run. This output will be used for grading, so ensure there are no errors in the Actions run.

Please update the node version used in the github action workflow to be
22.xinstead of20.x. This will fix any memory leaks errors raised while executing the test suite. In particular, change lines 23-26 of.github/workflows/main.ymlto be:
- name: Set up Node.js 22.x
  uses: actions/setup-node@v4
  with:
    node-version: "22.x"
Debugging
If you need help troubleshooting a problem, be sure to follow all the steps outlined in the course’s debugging policy. This will ensure you have exhausted all initial debugging strategies before reaching out for assistance from the TAs.
Academic Integrity
Please refer to the course policy page for more details.
For this assignment, the use of co-pilot or other generative AI technologies such as ChatGPT is not allowed.