Activity 8.1 Continuous Development Pipelines
In this activity, you will configure a continuous development pipeline using GitHub Actions, Heroku, and Netlify. Our pipeline will use GitHub Actions to build and test your Covey.Town fork. After successful compilation and testing, the pipeline will deploy the backend service to Heroku, create an optimized production build of the frontend, and deploy that frontend to Netlify.
This activity is split up into three phases: setting up GitHub Actions to build and test your project, then to deploy to Heroku, and lastly, to deploy to Netlify.
Pre-requisites
There are two pre-requisites for this activity: you must have a GitHub.com repository generated following our project forking instructions, and you must have a Twilio account.
If you run into the error “refusing to allow an OAuth App to create or update workflow” when trying to push to GitHub, the fix is to update your saved authentication credentials for GitHub. For instance, you can follow these instructions to update your credentials in the MacOS Keychain. If all else fails, you can connect to GitHub with SSH instead of HTTPS, which will also solve this problem. This error seems to only occur when pushing a change to the GitHub Actions configuration file, so you could also side-step the problem by having a team mate push this change to GitHub instead (who may not run into this issue).
Creating a Twilio account and recording the credentials
If you have not configured a Twilio account yet, follow these instructions to set one up:
- Go to Twilio’s website and sign up for an account. You do not need to provide a credit card to create a trial account, but will need to provide a cell phone number. a. When you create your account, to the question “Which Twilio product are you here to use”, answer “Video”, to “What do you plan to build…” answer “Other”, to “Preferred Language” select JavaScript, and to “Would you like Twilio to host your code?” select “No”. (It is OK to select other answers, but selecting these will bring you directly to the “programmable video” part of Twilio’s admin console.
- Create an API Key: Select the “Account” menu from the top toolbar, and then select “API keys & tokens”. If prompted, re-enter your password.
- Take note of the “Live Credentials” in the box lower on this page. The “Account SID” and “Auth token” will be necessary for step 5.
- Click “Create new API key”. Enter any descriptive name that you would like for the “friendly name”, and use the other default settings (US region, “standard” key type). Save the “SID” (this will be referenced later as the
TWILIO_API_KEY_SID) and the “Secret” (this will be referenced later as theTWILIO_API_KEY_SECRET). You’ll need this for your local development environment. You can share a single Twilio account with all of the members in your team (sharing the.envfile), but please be careful to avoid posting the contents of your.envfile publicly anywhere - someone else might find your credentials and run out all of the free minutes on your account. To set up GitHub Actions and Heroku, we’ll need the values from your.envfile - so be sure to get them working before proceeding. - Create a
.envfile in theservices/townServicedirectory, setting the values as follows:
| Config Value | Description |
|---|---|
TWILIO_ACCOUNT_SID |
Visible on your twilio account dashboard. Starts with AC… |
TWILIO_API_KEY_SID |
The SID of the new API key you created. Starts with SK… |
TWILIO_API_KEY_SECRET |
The secret for the API key you created. |
TWILIO_API_AUTH_TOKEN |
Visible on your twilio account dashboard. |
You should now be able to start the backend and fronted in your local development environment and have functioning video chat.
Set up GitHub Actions
Once your git repository is up-to-date, you can configure GitHub Actions by following these steps:
- Log in to GitHub, and navigate to your project. Go to the “Settings” tab, and then select “Secrets,” and under “Secrets” select “Actions.”
- Click “New Repository Secret”, and then enter each of your Twilio secrets (from your
services/townService/.envfile) as new variables here, as shown in this screenshot: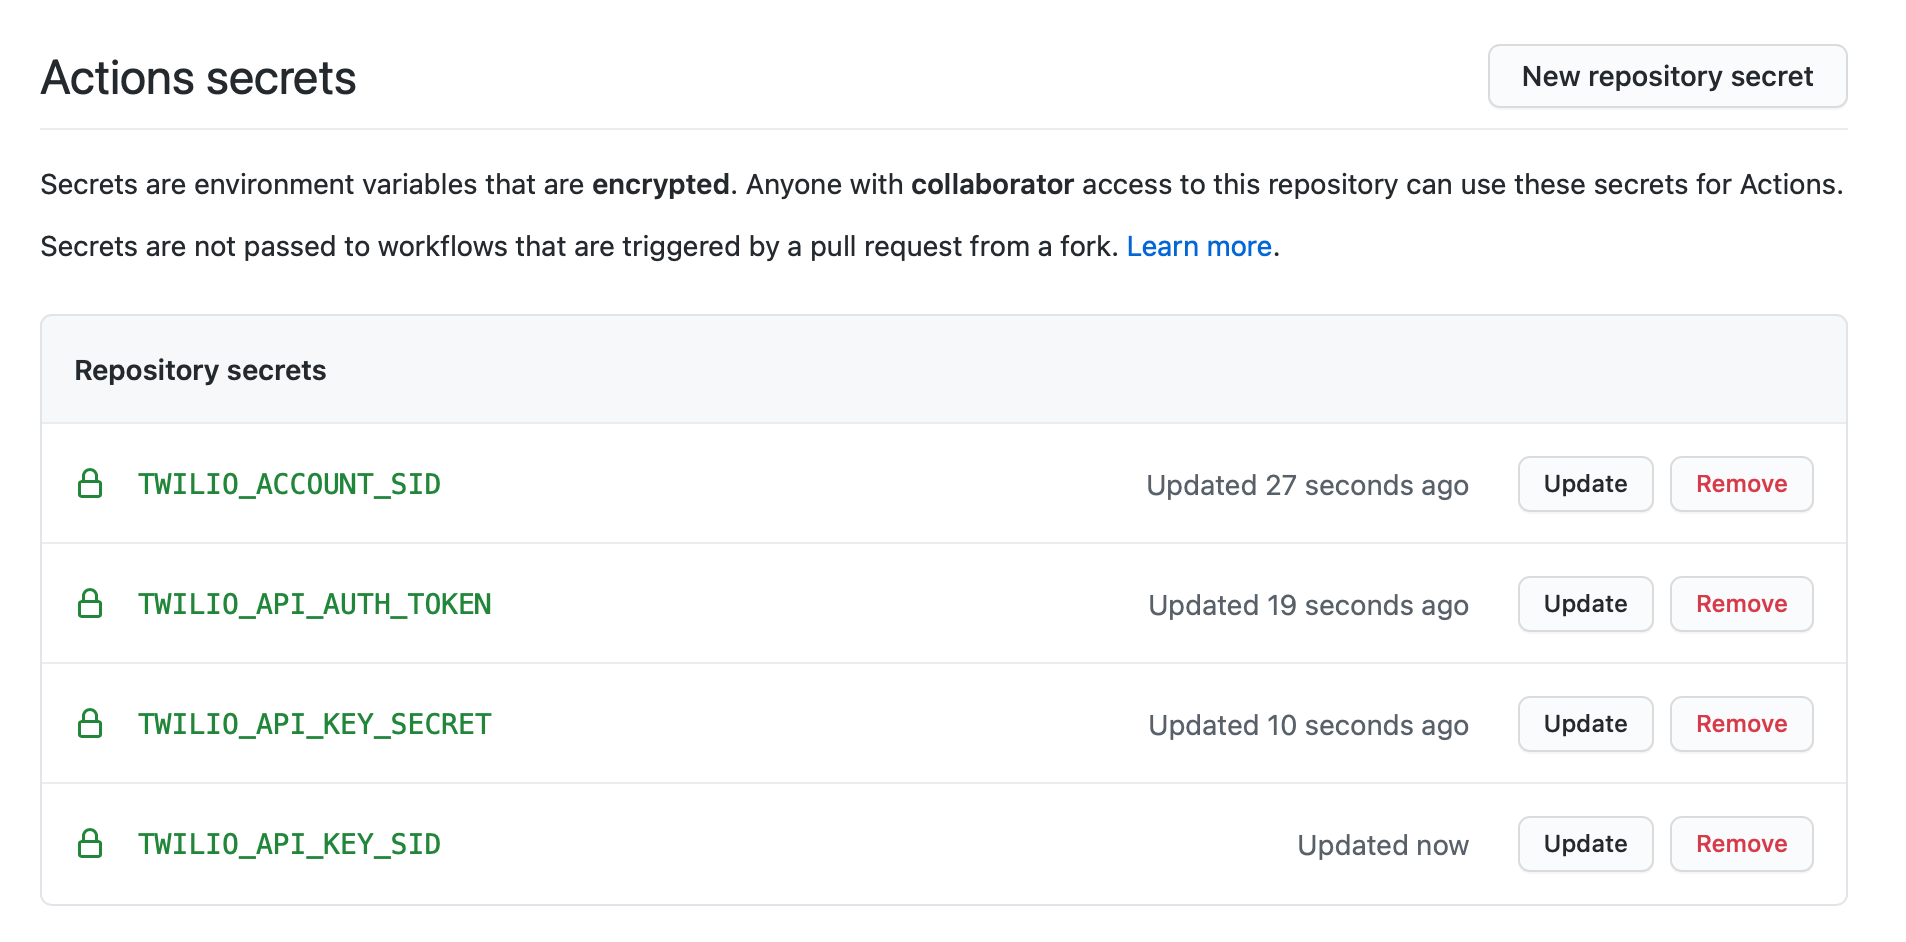
-
Navigate to the “Actions” tab in GitHub. If you had made commits previously, you may have seen them fail due to the missing twilio configuration (or, they may have never run). You can test that the CI workflow is correclty working by selecting the “Covey.Town CI” workflow on the left, then “Run worklow” and trigger the workflow to run on the
mainbranch. While it’s running, let’s take a brief look at the workflow configuration that will run the tests, by looking at the.github/workflows/main.ymlfile. Update thepushandpull_requestbranches to referencemaininstead ofmaster(the template repository still usesmasteras the default branch, but yours will usemain)name: Covey.Town CI on: # Controls when the action will run. # Triggers the workflow on push or pull request events but only for the master branch. If you want to trigger the action on other branches, add here push: branches: [ main ] # Says 'master' in starter code, change to 'main' pull_request: branches: [ main ] # Says 'master' in starter code, change to 'main' # Allows you to run this workflow manually from the Actions tab workflow_dispatch: # A workflow run is made up of one or more jobs that can run sequentially or in parallel jobs: build-and-test: # # The type of runner that the job will run on runs-on: ubuntu-latest # Steps represent a sequence of tasks that will be executed as part of the job steps: - uses: actions/checkout@v2 - name: Build and test backend service env: # Pass the Twilio secrets into environmental variables for the backend tests to use TWILIO_ACCOUNT_SID: ${{ secrets.TWILIO_ACCOUNT_SID }} TWILIO_API_AUTH_TOKEN: ${{ secrets.TWILIO_API_AUTH_TOKEN }} TWILIO_API_KEY_SECRET: ${{ secrets.TWILIO_API_KEY_SECRET }} TWILIO_API_KEY_SID: ${{ secrets.TWILIO_API_KEY_SID }} run: cd services/townService; npm install && npm test - name: Build and test frontend components run: cd frontend; npm install && npm test - Navigate back to the “Actions” tab. You should still see the build passed. If the “build-and-test” job failed, consider the following troubleshooting tips:
- If the build failed due to the HW4 tests (we inadvertently configured it such that some students may have the HW4 tests in their repo), delete those test files (
ConversationAreasList.test.tsxandPlayersList.test.tsx). After HW4, we will distribute the solution to HW4 and then these tests can be re-activated. - If the build failed with
No tests found, exiting with code 1, then your repository does not have any tests - perhaps they were deleted? - If the build failed due to undefined Twilio secrets, double check that you have correctly entered the Twilio secrets from your
.envfile into the GitHub Settings -> Secrets for your repository. Make sure that you have put the secrets on the same repository that you are setting up the GitHub Actions for.
- If the build failed due to the HW4 tests (we inadvertently configured it such that some students may have the HW4 tests in their repo), delete those test files (
Set up Heroku
Now that we have GitHub Actions successfully running our tests, we can configure it to also automatically deploy the backend rooms service to Heroku. This way, you can have a publicly available version of your backend service, which will automatically update with any changes that you push to Git. Note that it is possible to set up Heroku to automatically deploy every new change that you push to GitHub (without setting up GitHub Actions). Instead, we’ll configure our GitHub Actions pipeline to deploy to Heroku only if our test suite passes.
- Go to Heroku.com and create an account, or sign in if you already have one
- After signing in, create a new app. Choose a name for your app that is somewhat descriptive - it will become part of the URL that you’ll use to access the service. Click “Create app” (no need to go through “Add to pipeline…”)
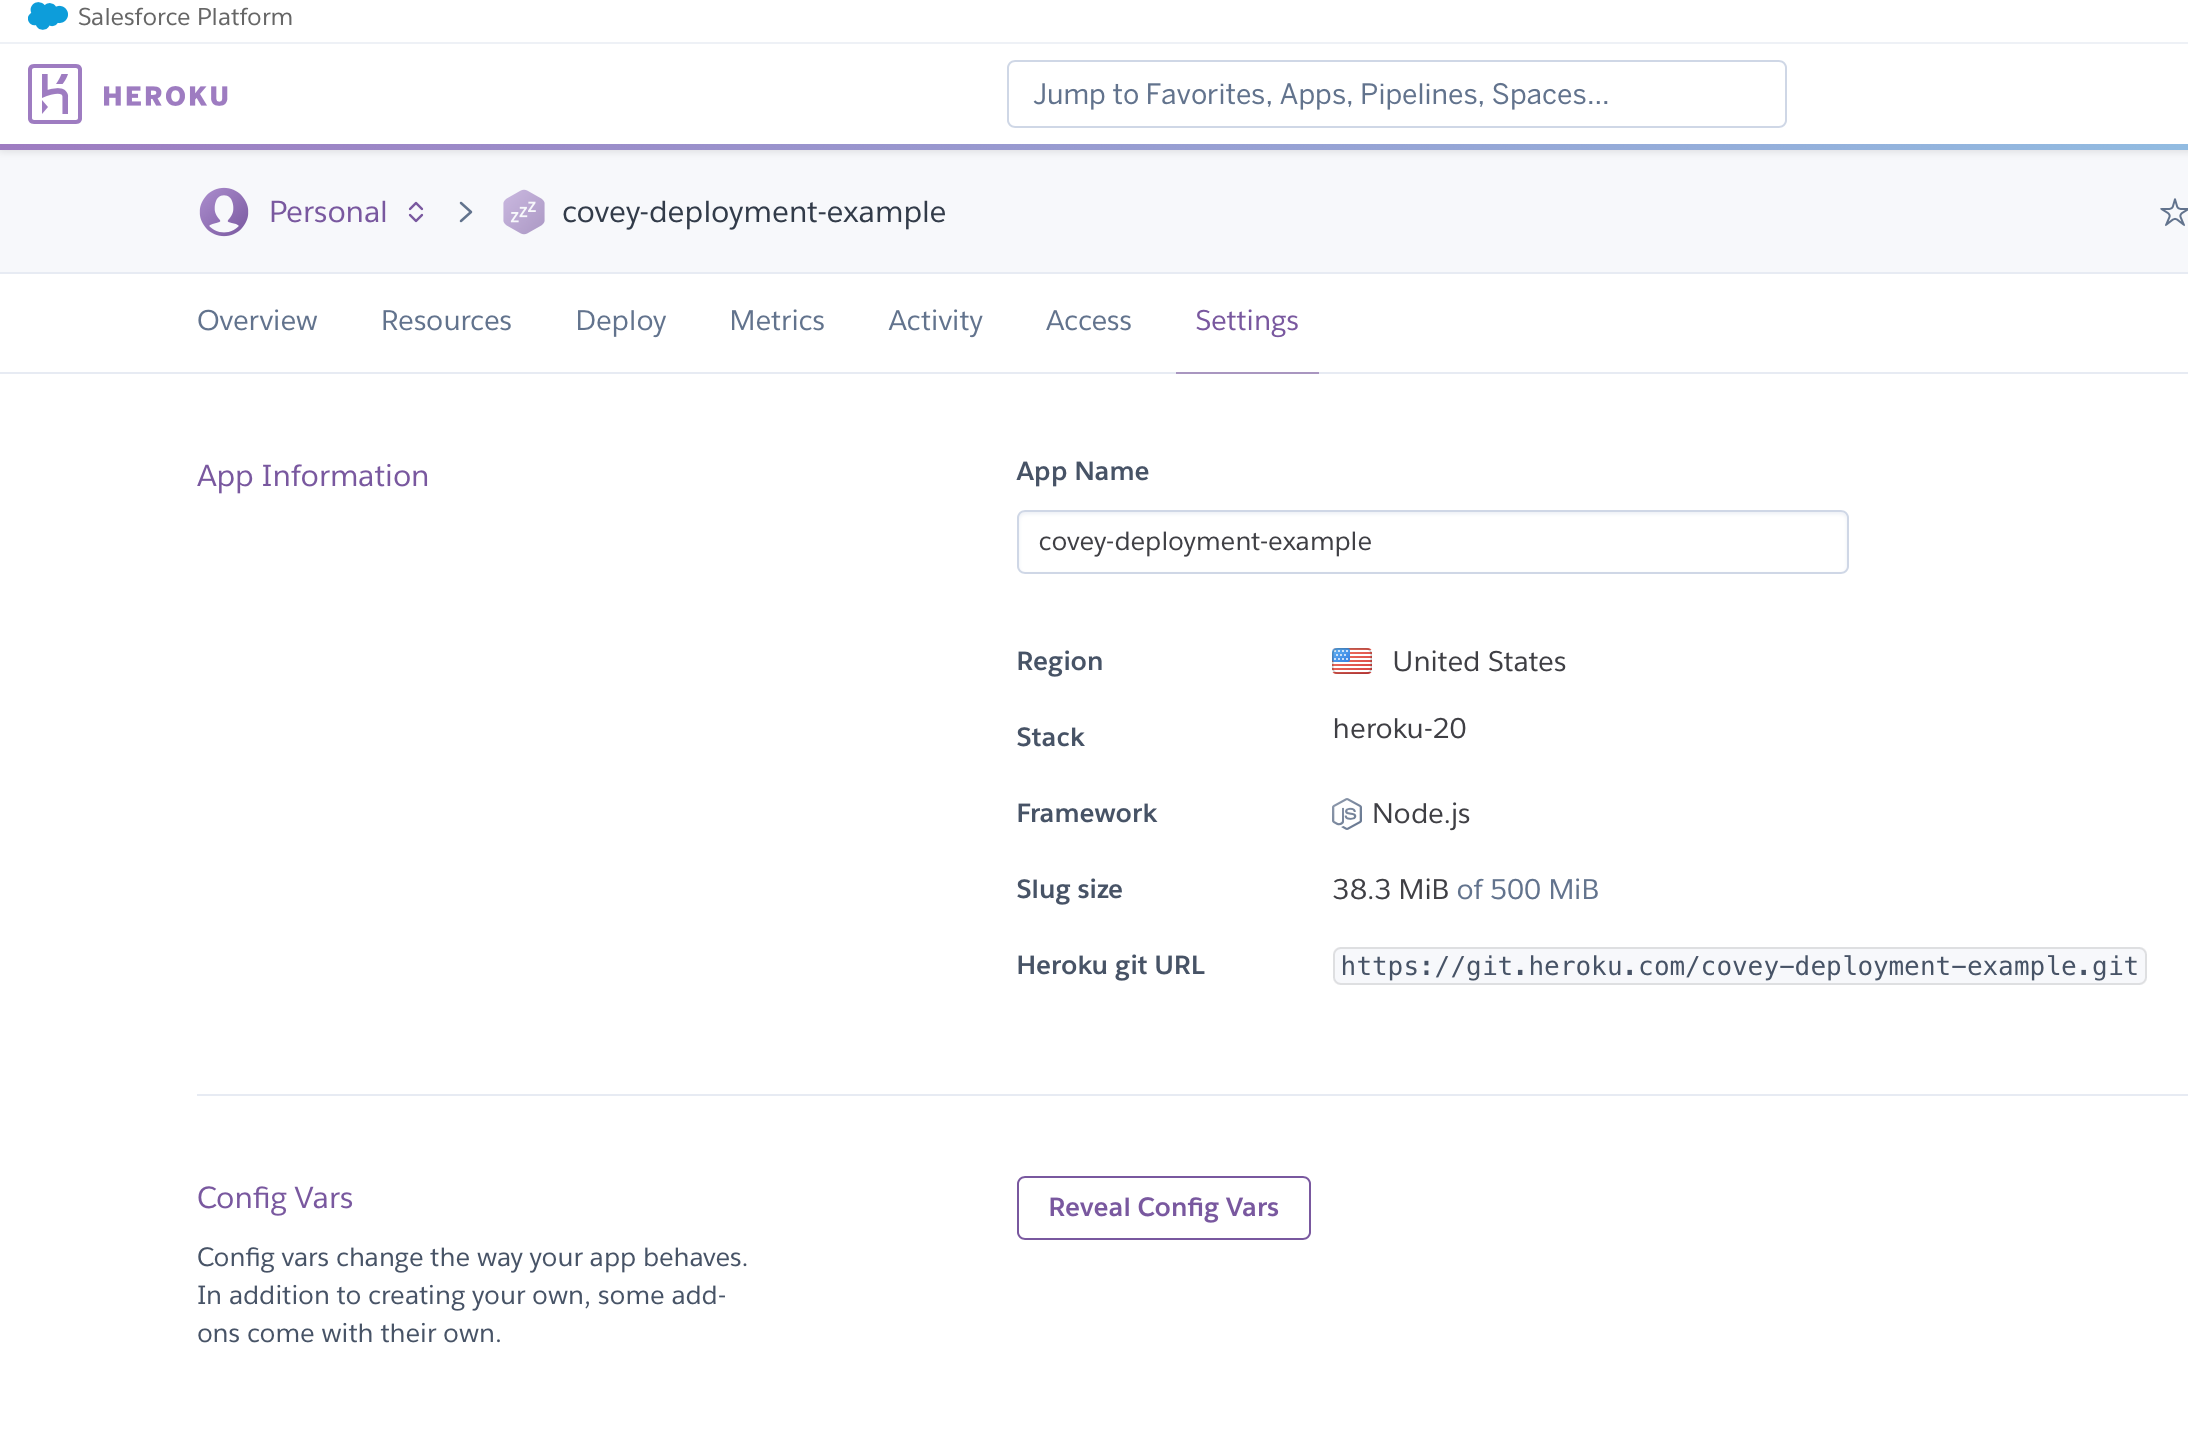
- After creating your app on Heroku, open the app’s settings page, revealing a page that looks like this:
- Click “Reveal Config Vars”, and enter the 4 twilio configuration variables from your
.envfile (the same 4 that you set up on GitHub Actions). Heroku’s “Config Vars” are the way that we tell Heroku what variables to use for.envwithout having to commit that file into the (publicly viewable) repository. Your configuration settings on Heroku should look like this now: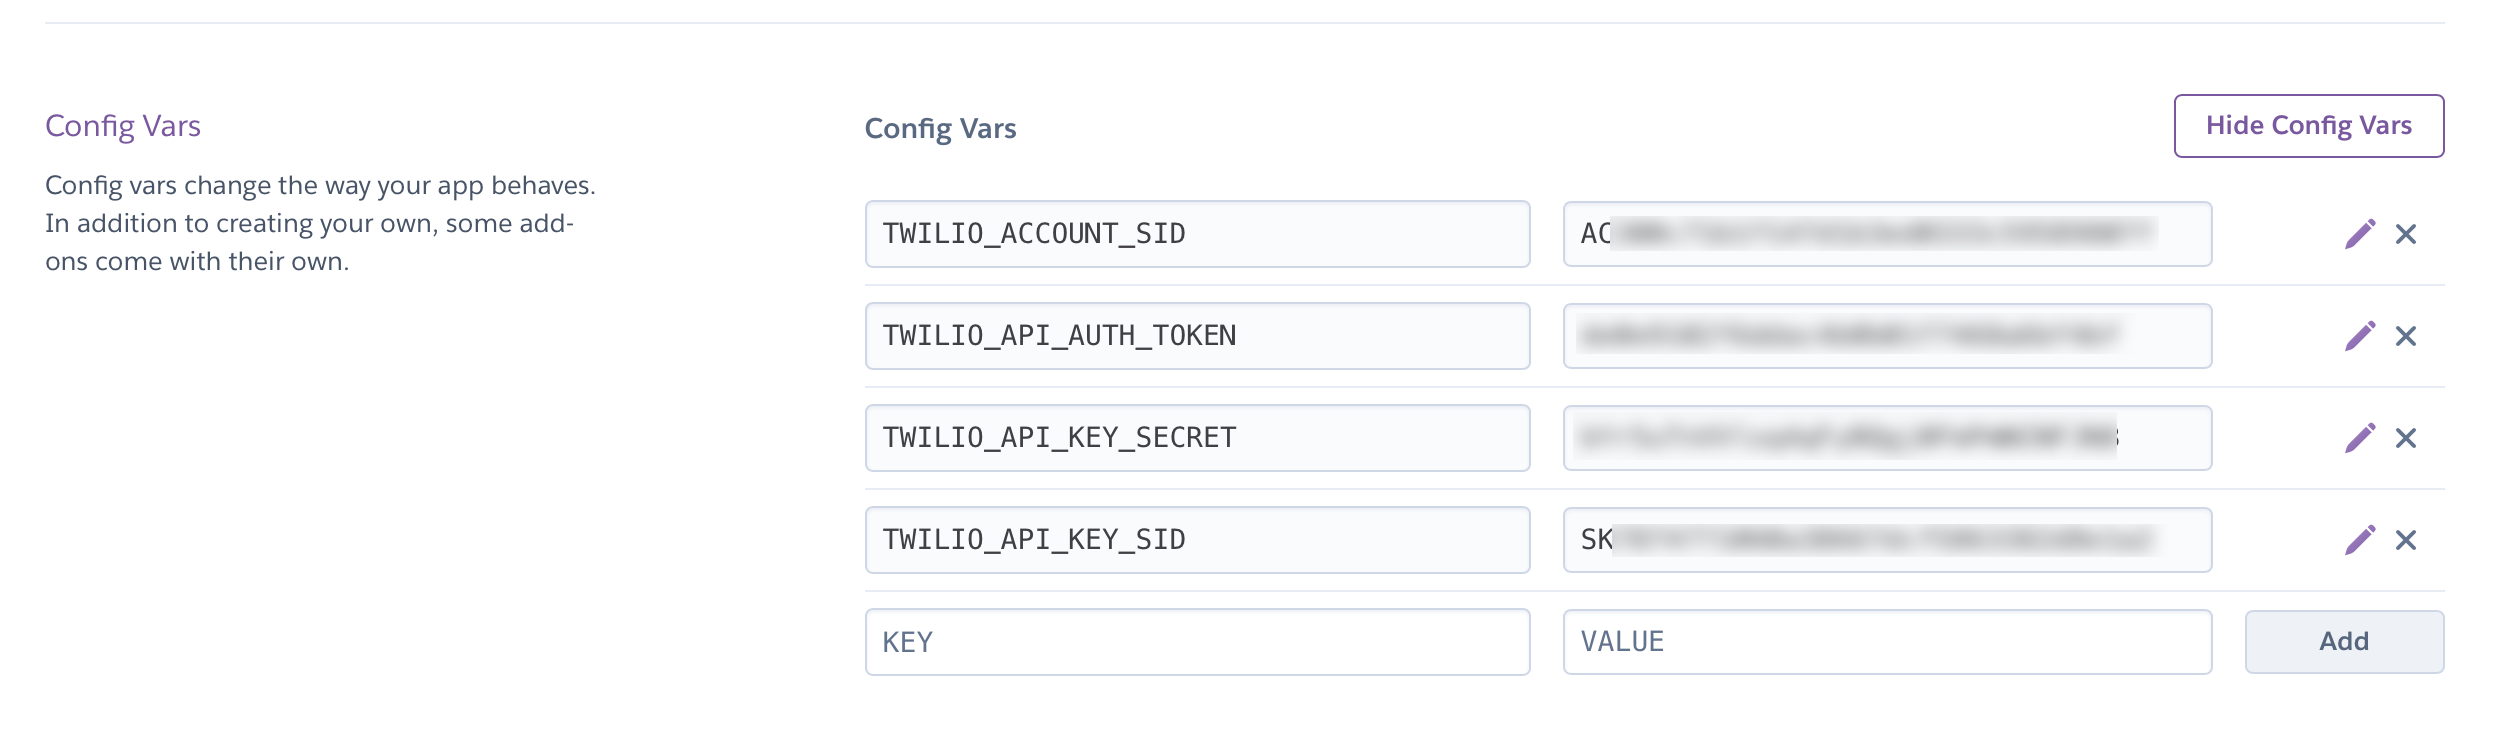
- Before navigating away from this settings page, scroll down to “Domains”, and take note of the address that Heroku has provided for your app. This should say something like “Your app can be found at https://covey-deployment-example.herokuapp.com/”.
- Retrieve your personal Heroku API key. From Heroku go to “Manage Account” (click on the profile menu on the top right of the page and then click “Account Settings”.
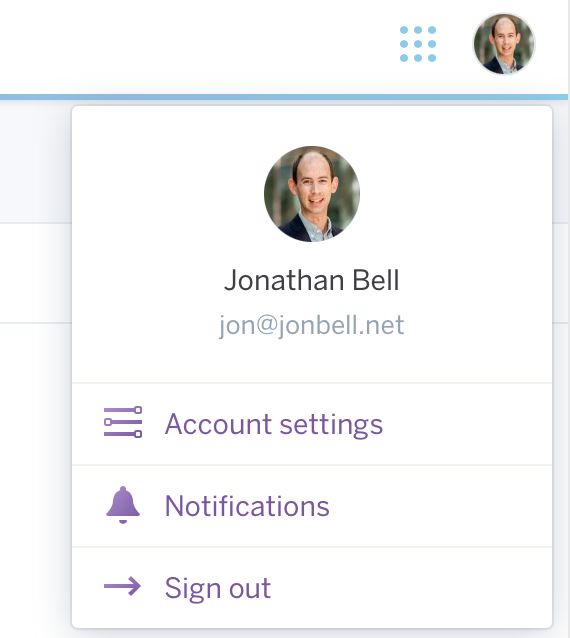 Scroll down to “API Key” and click “Reveal”. Copy this key, you’ll use it in the next step.
 - Return to the GitHub Settings -> Secrets -> Actions pane, and add a new repository secret:
HEROKU_API_KEY, setting the value to the exact string that you copied from “API Key” in the last step. Add the secretHEROKU_APP_NAME(in this example, our app name iscovey-deployment-example), set to the name that you choose for your Heroku app in step 2. Add the secretHEROKU_EMAIL, set to the email address that you used when you created your Heroku account. Even though these last two values aren’t secret per-say, configuring them in this way keeps them out of the config files, so you won’t run into merge conflicts with our upstream branch (which would have amain.ymlfile with our own settings in it). - Update the CI workflow (the file
.github/workflows/main.yml). The starter code has the Heroku deploy commented out: uncomment it, and replace the lineif: github.ref == 'refs/heads/master'withif: github.ref == 'refs/heads/main'. -
Return to your GitHub Actions page, and the detail view for the most recent build - retrigger it, so that it runs again. Now that we have the Heroku secrets installed, we expect the “Deploy to Heroku” aspect of the deployment job to pass, although the “deploy to netlify” task will still fail. Here is the segment of the GitHub Actions configuration file that deploys our app to Heroku:
deploy: if: github.ref == 'refs/heads/main' needs: build-and-test runs-on: ubuntu-latest steps: - uses: actions/checkout@v2 - uses: akhileshns/heroku-deploy@v3.12.12 # Deploy to Heroku action with: heroku_api_key: ${{secrets.HEROKU_API_KEY}} heroku_app_name: ${{secrets.HEROKU_APP_NAME}} heroku_email: ${{secrets.HEROKU_EMAIL}} - To confirm that your service is successfully deployed, try to visit it in your browser. Use the URL that you noted in step 5 (“Your app can be found at https://covey-deployment-example.herokuapp.com/”). Append
townsto the URl, and visit it in your browser (e.g.https://covey-deployment-example.herokuapp.com/towns). After a short delay, you should see the response{"isOK":true,"response":{"towns":[]}}.
Set up Netlify
The last step to our continuous development pipeline will be to automatically deploy our frontend to Netlify. Netlify will create an optimized production build of your frontend (by running npm run build) and host it in their globally-distributed content delivery network. Netlify will also automatically build an deploy previews of pull requests on your repository.
- Create a free account on Netlify. We suggest signing up with GitHub.
- After logging in, select “Add new site”, then “Import an existing project” and then select “GitHub” as your git provider. Follow the prompts to connect Netlify with GitHub, and then choose the “neu-cs4530-s22” organization (you might need to click “Add another organization” in the dropdown to find it, and then select your repository. Leave “branch to deploy” as “main”. Set the base directory to
frontend, the build command toCI= npm run-script build, and the publish directory tofrontend/build. Click deploy site. - Click on “Site Settings” and scroll down to “Environment”. This is where we define the
.envvariables that Netlify should use (without needing to put.envin a publicly viewable place). Click “Edit variables” and add a single variable:REACT_APP_TOWNS_SERVICE_URLshould be set to your heroku server name (https://yourapp-name.herokuapp.com, find in heroku “settings” page for your app). Click save. - The very first deploy that was triggered will not have this environmental variable set, and hence the resulting build won’t actually be functional. Cancel the build if it is still in progress, and then click “trigger build” to trigger a new build. Once you confirm that it builds correctly, it will always auto-build and deploy without needing this intervention.
- Netlify will take several minutes to build your site. From the “Deploys” view of Netlify’s control panel, you can see the status of each build. Once you have a successful build, it will show a URL where your site is published (something like https://mystifying-beaver-b51dd2.netlify.app). Visit the site and confirm that it’s working. If you see an error in the JavaScript log like
process is not defined, this indicates that the site was not built with theREACT_APP_TOWNS_SERVICE_URLvariable set - confirm that it is correctly set, and then rebuild the site on Netlify.